Envoy 101: Configuring Envoy as a Gateway
As an Open Source project, Envoy has a huge following, and the user numbers are continuing to grow because of how it can be used to solve networking p

As an Open Source project, Envoy has a huge following, and the user numbers are continuing to grow because of how it can be used to solve networking problems that occur in any large, distributed system. But what is it? How do you get started?
This is Envoy 101, and ideal for anyone new to Envoy. It’ll provide an easy-to-follow introduction to setting up Envoy as a gateway, with example yaml, and an explanation of what the yaml is doing at each step and why. At the very end, there’ll be the full ‘envoy.yaml’ that you can try yourself, to set up a gateway and use it to direct traffic to two services!
Tetrate offers an enterprise-ready, 100% upstream distribution of Istio, Tetrate Istio Subscription (TIS). TIS is the easiest way to get started with Istio for production use cases. TIS+, a hosted Day 2 operations solution for Istio, adds a global service registry, unified Istio metrics dashboard, and self-service troubleshooting.
Uses for Envoy – What it is, and why it matters
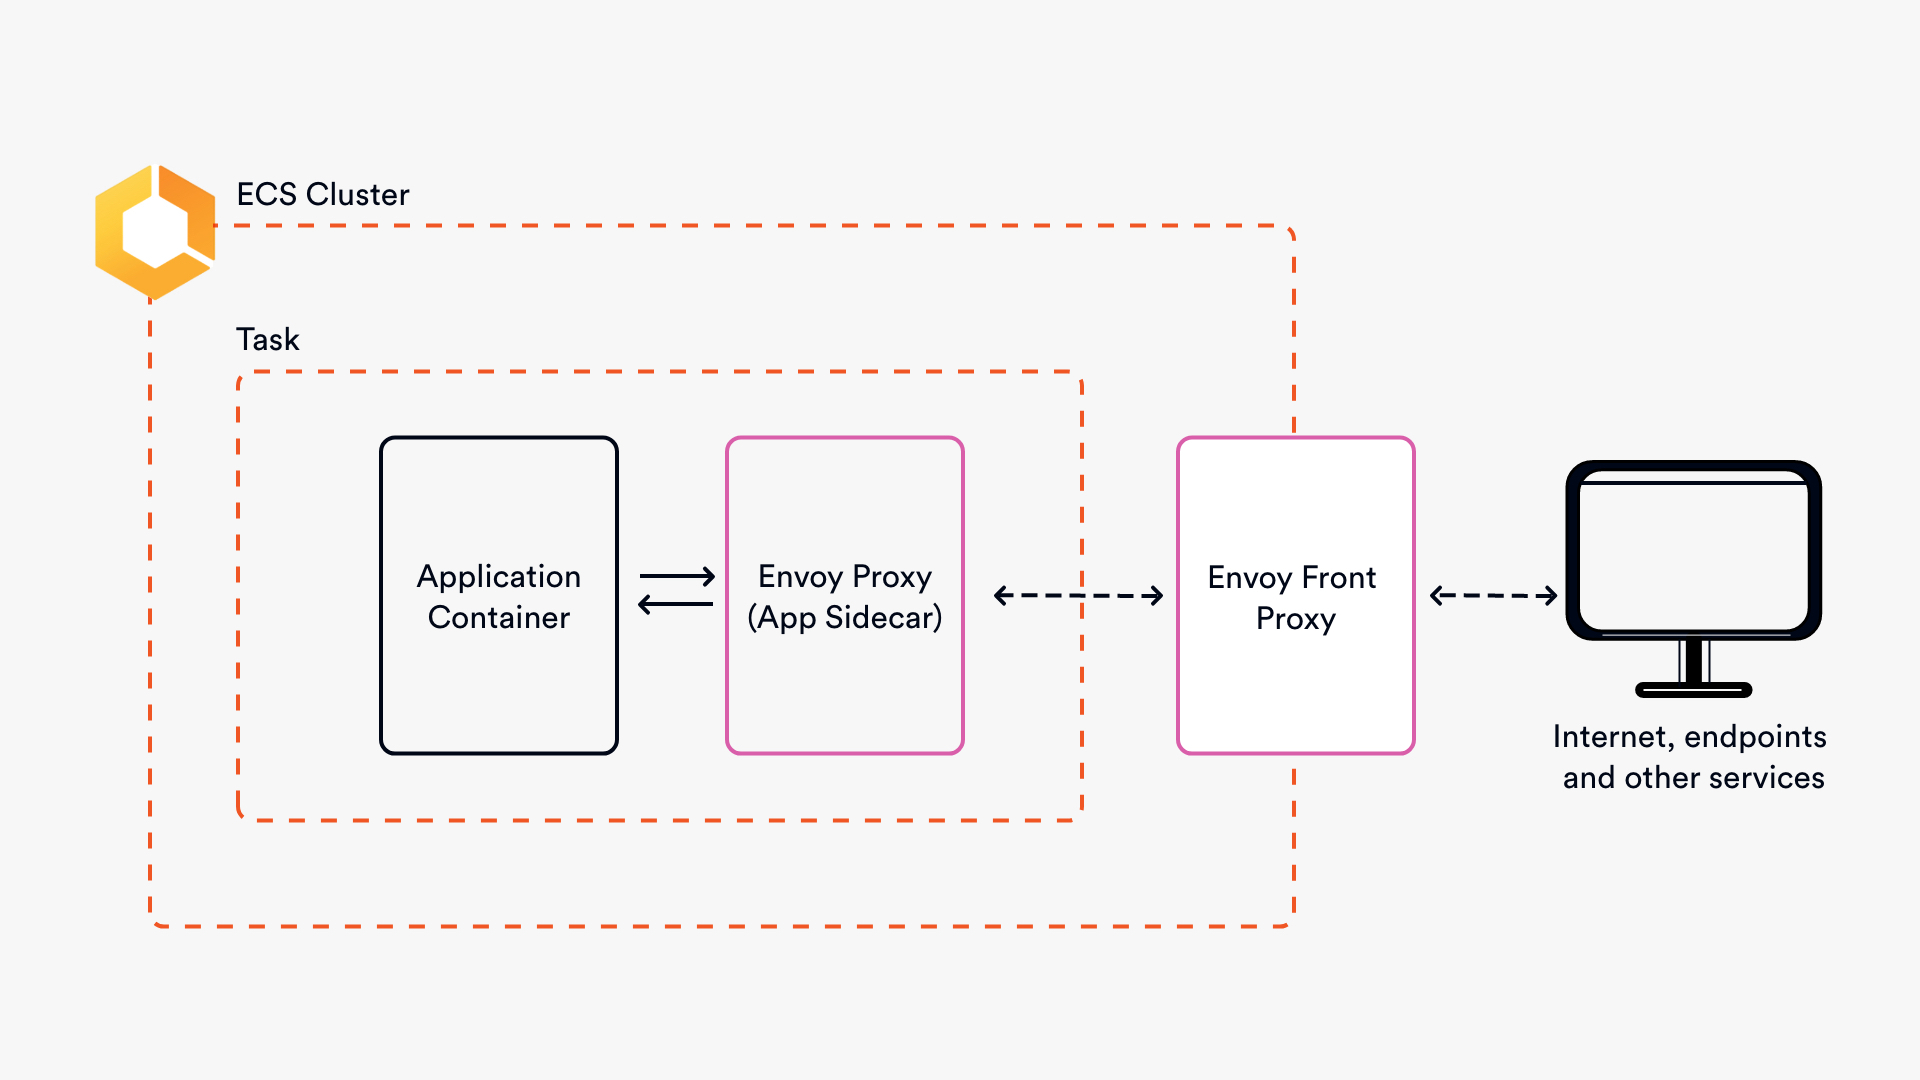
Envoy proxy has two common uses, as a service proxy (sidecar) and as a gateway:Â
As a sidecar, Envoy is an L4/L7 application proxy that sits alongside your services, generating metrics, applying policies and controlling traffic flow.Â
As an API gateway, Envoy sits as a ‘front proxy’ and accepts inbound traffic, collates the information in the request and directs it to where it needs to go. This example will demonstrate the use of Envoy as a front proxy. It will mean writing a static configuration that returns static data that won’t change, for example, that it’s HTTP and IPv4. It’s simple and great for handling information that rarely changes, as you’ll see in this example.


What will this configuration do?
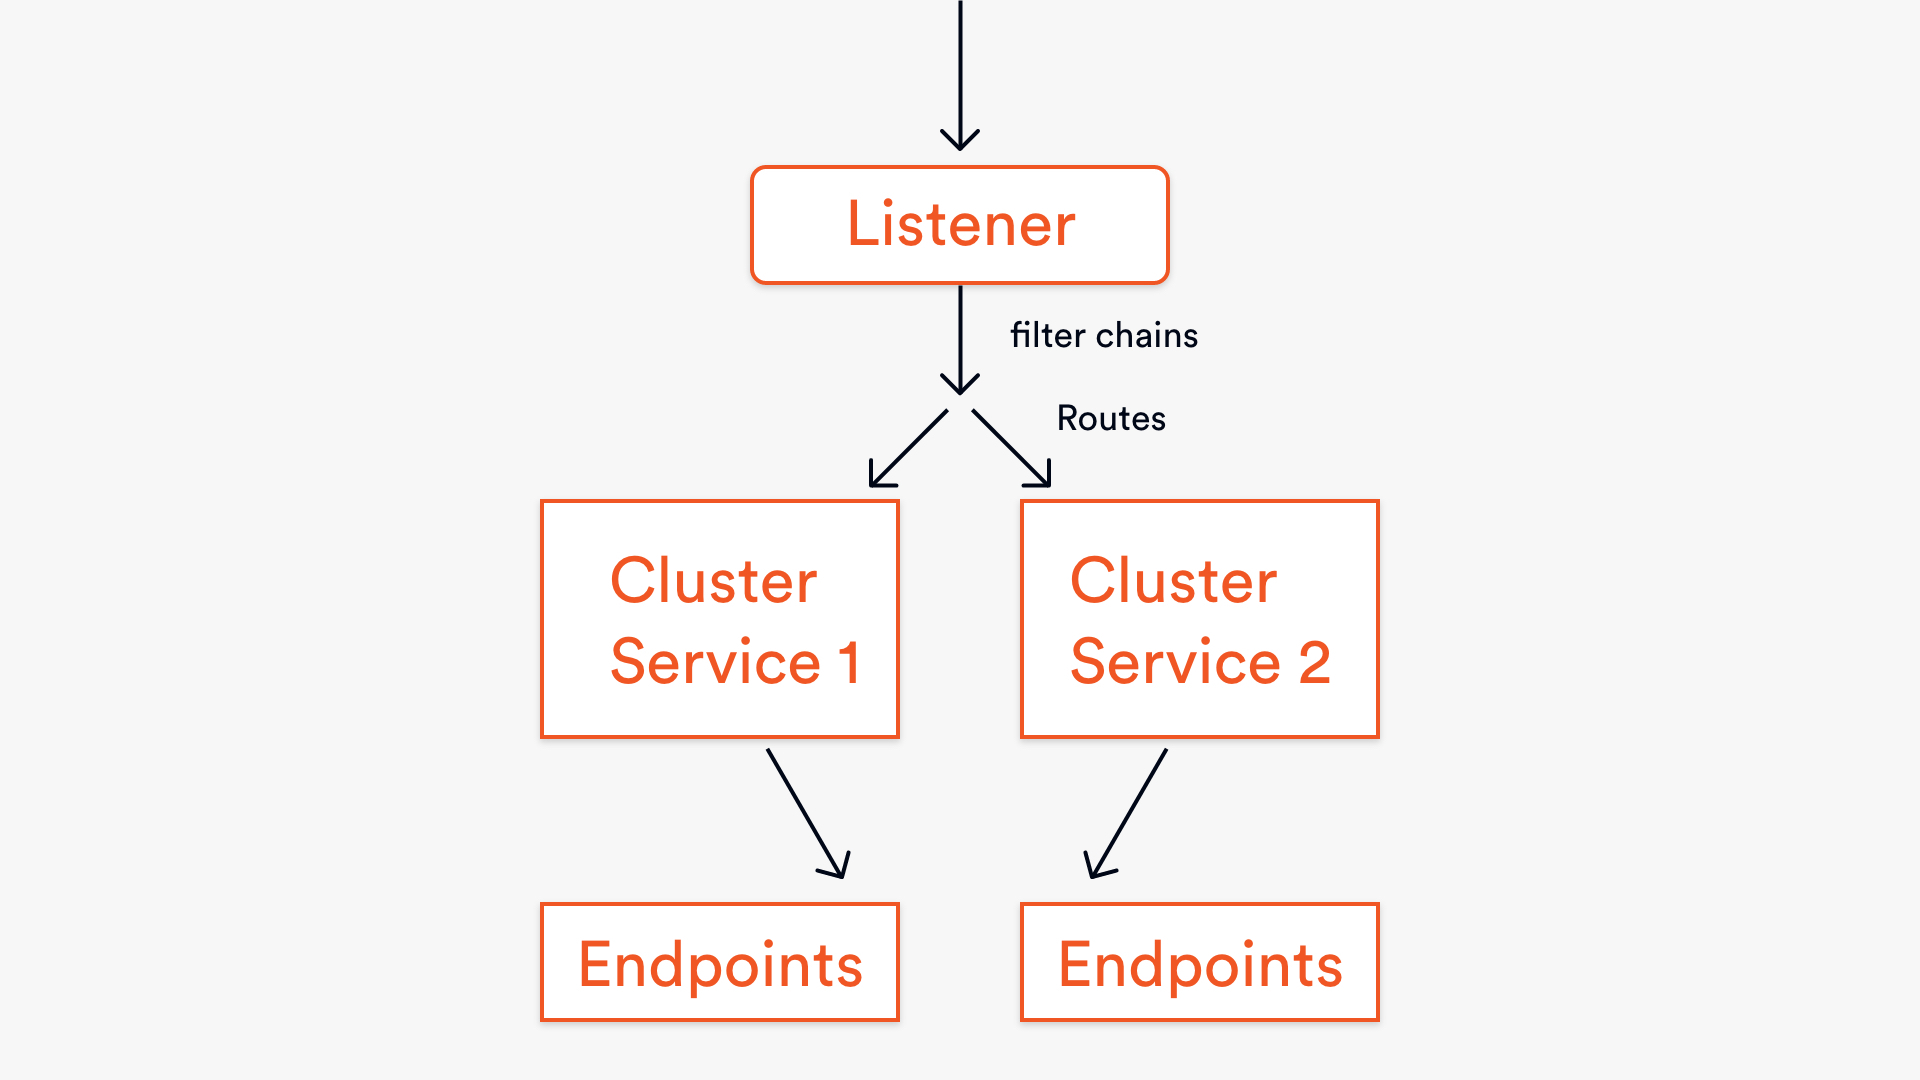
This yaml configuration is a great starting point because it shows you how to use Envoy to route traffic to different endpoints, and it also introduces you to some key concepts.Â
The arrows in the diagram show the flow of a request through the configuration, and the five key elements are the ‘listener,’ ‘filter chains,’ ‘routes,’ ‘clusters,’ and ‘endpoints’. The route is part of the filter chain, which is part of the listener.Â
If it’s not feeling entirely clear yet, hopefully, it will soon! Simply put they’re the important bits of the static API yaml that describe how this Envoy gateway should handle traffic.Â


The listener has the most important job. It’s the one that ‘binds’ to a port and listens for inbound requests to the gateway. The listener will only accept requests from the port that it’s bound to. Any request that comes in via another port would not be seen or handled by Envoy, and the user would get an error.
Once it’s been accepted by the listener, the request will go through a filter chain, which describes how the request should be handled once it’s entered Envoy. The filter chain consists of several filters that will decide whether a request can be passed on to the next filter or short circuit and send the user a 404 error.Â
Then, in this example, if a request passes all the filters in the chain, the route (as an extension of the filter chain) takes the HTTP request information and directs it to the correct service.
Now, having looked at what Envoy is capable of, and a basic flow of a request, let’s walk through the yaml.


Understanding the yaml
Before running the full configuration, it is a good idea to understand what each section is trying to do. At each section it’ll introduce you to some core concepts (and terminology) that you’ll see more and more as you work with Envoy and read the documentation.Â
Declaring a static resource
Filter chains and routes
The filter chain, as noted earlier, consists of many filters that form a chain, and the yaml describes how the requests should be filtered and routed once it enters Envoy. The first thing that’s happened is to define the filter as a http_connection_manager. Then it is sent to the http_filters and the http.router.Â
The other part of this filter chain is telling the chain to route traffic according to the prefix and the cluster that it matches. Routing will generally happen based on the HTTP nouns, which include the headers, path, or hostname, but in this example, the request is being routed based on the path as opposed to the header or hostname (as shown in the match: prefix lines).Â
Setting up clusters
Similarly, setting up two clusters here is pretty nondescript and easy to do. Why two clusters? Because it’s routing traffic to two different sets of endpoints! The services are named. They have a connection timeout of 0.25s and a round-robin load balancing policy. In a production environment, round-robin might not be the best choice, but for the sake of a demo explanation, it works. For more information on what type of timeouts can be configured in Envoy, take a look at the Envoy docs.
What’s particularly interesting to note is the use of HTTP/2, which in comparison to its predecessor changes how the data is formatted and transported to reduce latency. If you’d like to know more about HTTP/2, then I’d recommend reading this introductory piece from Google on Web Fundamentals.
Admin
Here the admin access to the Envoy admin panel has been set up. This means that you can access the admin data in localhost.Â
The full yaml
Try it for yourself
First up, make sure that Docker Compose is running. If not, follow these instructions for where to start: https://docs.docker.com/compose/gettingstarted/.Â
Then, everything you’ll need to run this is in here: https://github.com/envoyproxy/envoy/tree/master/examples/front-proxy.Â
Once you’ve followed the instructions in the GitHub repo, you’ll want to see the output! (Don’t worry about any service.py errors. They don’t matter and won’t impact how the script runs).
Run `docker-compose up` and you’re away!
Once you see the confirmation in the bash terminal that services 1 and 2 are running.
Open the http link in your browser and add /service/1 or /service/2 to the end of the web address, without that, you’ll see a 404 error.Â
There you have it! You’ve set up an Envoy gateway for yourself and used it to direct traffic to two services.Â


Recap
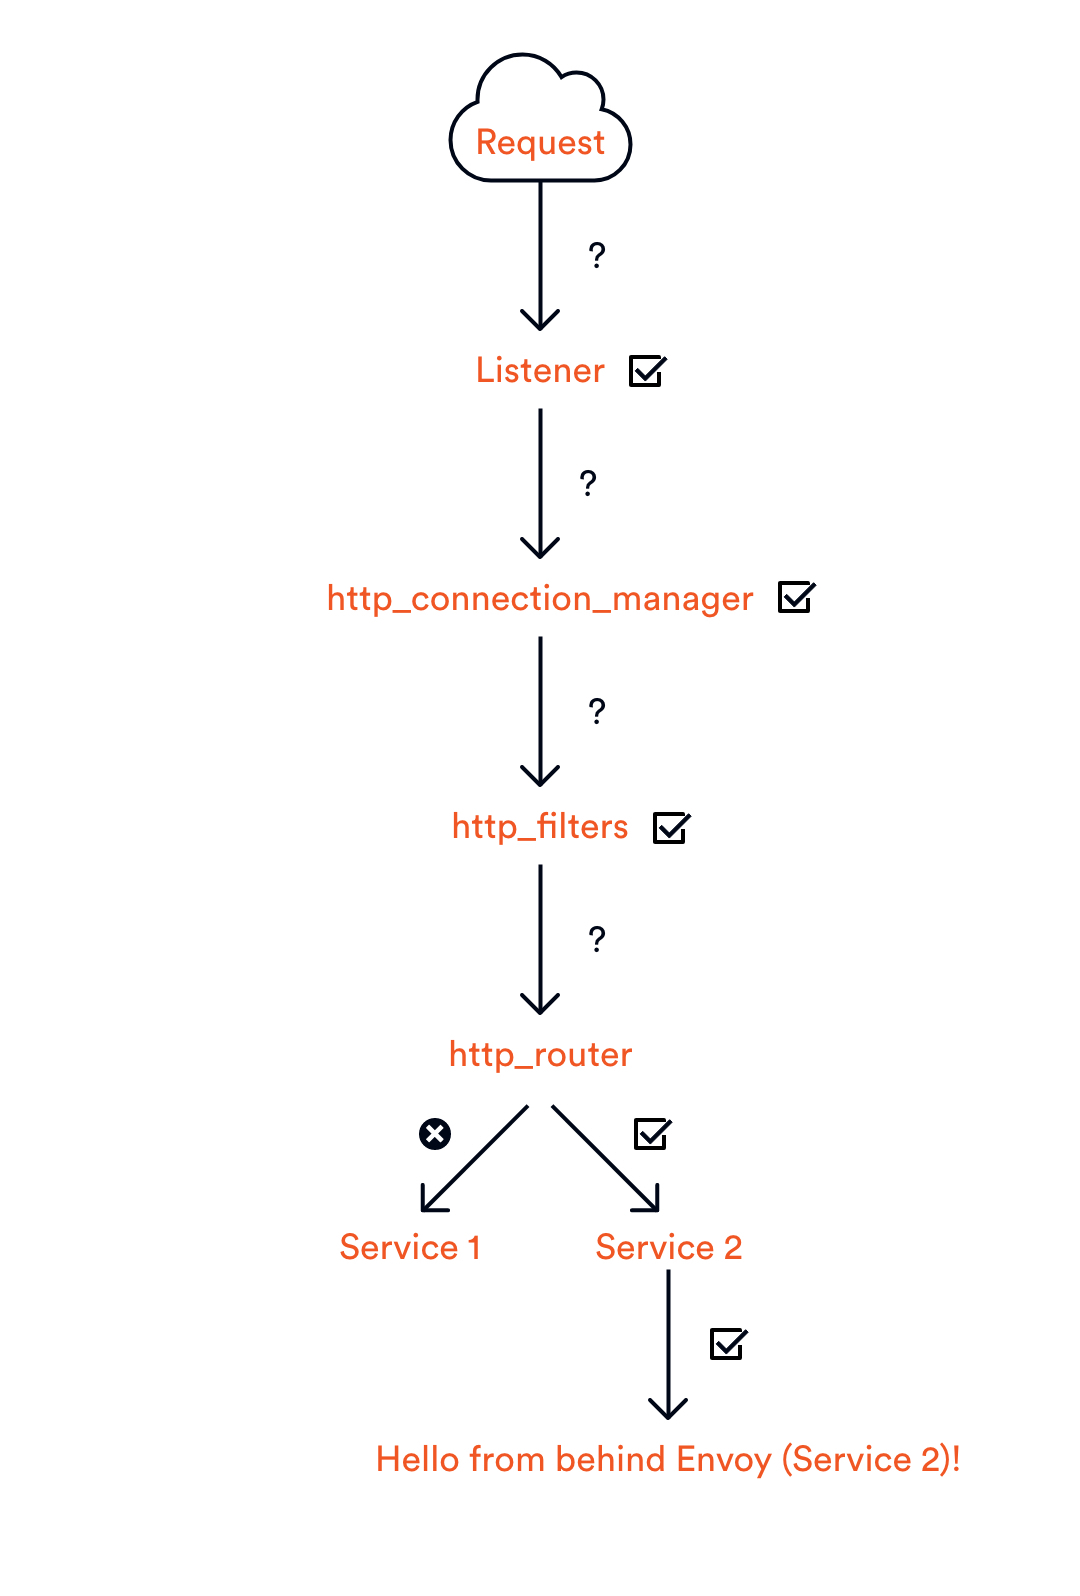
Now, let’s look at why the configuration works in the way that it does. The diagram below shows the flow of the request through Envoy to the Service 2 endpoint.


At each step, there’s a verification that takes place to make sure that information is correct, and it’s going to the right place. If, for example, you attempted to make a request to /service/3, it would make it all the way to the router before it determined there was nowhere to route the request to. Service 3 does not exist.Â
Static configurations are great in situations where there is predictability and simplicity. However, they are not practical in dynamic environments that are subject to regular changes. If you were to try to use static configurations in a dynamic environment, there’d be a lot of manual changes (not a good use of time).Â
Therefore, this blog should have given you a good introduction to key concepts within Envoy, however, I wouldn’t recommend putting this into production!Â
If you’d like to know more about Envoy, check out our library of resources, and our Open Source project GetEnvoy.


