Trying out Istio’s DNS Proxy
You may have heard that DNS functionality was added in Istio 1.8, but you might not have thought about the impact it has. It solves some key issues th

You may have heard that DNS functionality was added in Istio 1.8, but you might not have thought about the impact it has. It solves some key issues that exist within Istio and allows you to expand your mesh architecture to include multiple clusters and virtual machines. An excellent explanation of the features can be found on the Istio website. In short, it enables seamless integration across multiple clusters and Virtual Machines. In this article, we’ll test out the new features and hopefully explain more about what is happening under the hood.
Enabling Istio’s DNS Proxy
This feature is currently in Alpha but can be enabled in the IstioOperator config.
DNS queries
Now that DNS records can be cached within the Istio sidecar, the strain on kube-dns has been relieved. But the improvements don’t end there. Due to the default settings, it also reduces the number of queries being made every time a lookup is made. This results in improved resolution times. Let’s take a look at what happens when I add a ServiceEntry for istio.io.
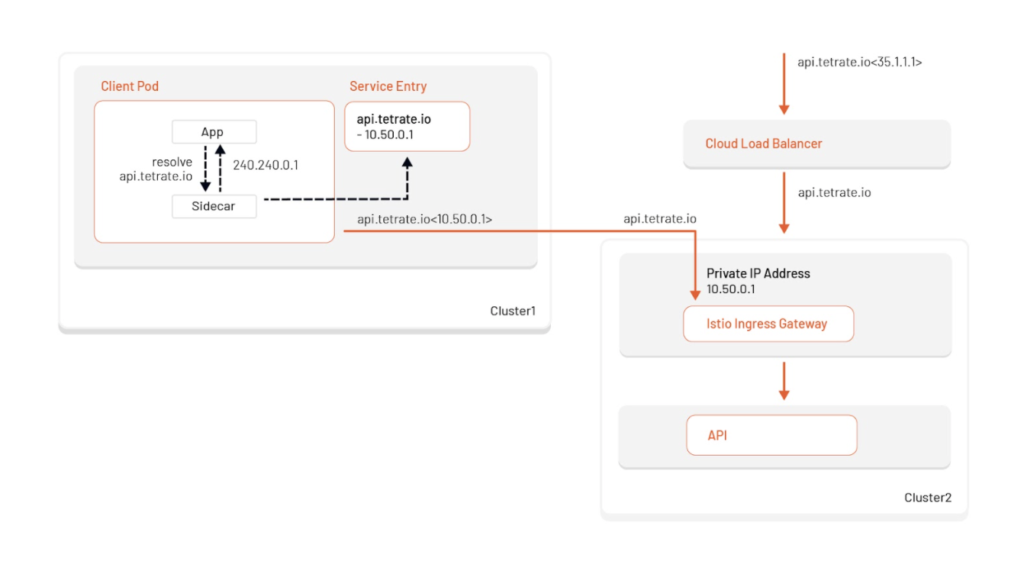
You might assume that your pod would resolve istio.io to its publicly available ip addresses, but instead the Istio sidecar is returning an auto-assigned virtual IP `240.240.0.1` issued by Istiod.
If you’re like me, you might have checked to see if Istio modified the /etc/resolv.conf to route to somewhere else, but to my surprise, it was still pointing to kube-dns.
This is because Istio hijacks requests to kube-dns using IP tables and routes requests instead to the Istio agent running in the pod.
Finally, we need to remember that when your application pod resolves istio.io to a VIP and makes a request, the VIP is exchanged for the actual public IP address within Envoy. If we take a look at the Envoy configuration, we can see how this is done.
First we will take a look at the Envoy listeners. We should see a listener for the istio.io ServiceEntry in the form {VIP}\_{PORT}. The important piece in the listener is where it is being proxied to. For that we look in the “envoy.filters.network.tcp_proxy” for the Envoy cluster. Afterwards we will look at how the cluster discovers the real public IP address for istio.io.
istioctl proxy-config listeners my-pod -o json
Looking at the istio.io cluster, we will see an outbound entry for istio.io using STRICT_DNS — which means that Envoy will continuously and asynchronously resolve the specified DNS targets. This is how we get our public IP address for istio.io
istioctl proxy-config clusters my-pod -o json
In conclusion, because we made the istio.io ServiceEntry, your pod will query the Istio DNS for istio.io and receive a VIP. That virtual IP is then translated into the public IP address when a request is made through the envoy sidecar.
External TCP traffic
Istio currently has a limitation on routing external tcp traffic, because it is not able to distinguish between two different tcp services. This limitation especially impacts the use of third party databases, such as AWS Relational Database Service. In the example below, we have two service entries for different databases within AWS. They are exposed on the default port 3306, unless manually specified. Pre Istio 1.8 TCP ServiceEntries would create an outbound listener on sidecars for 0.0.0.0:{port}. You might have noticed that if you have multiple TCP ServiceEntries with the same port, they will have conflicting Envoy listeners. In fact, we can test this ourselves. The below example uses two TCP ServiceEntries with the same port. Feel free to try this yourself.
If we take a look at a pod running in the mesh, we would expect to see two listeners for the separate databases. But because they only key off port, only one listener is created.
The only solution currently is to change the default port of your database to work within Istio. Below, I changed the port on db-2 to 3307 and now we see both outbound TCP listeners.
Now with Istio mesh DNS, a virtual IP address is assigned to the service entries automatically. This gives us the flexibility of matching listeners on VIP address as well as the port, as shown below. This was captured with Istio 1.8 with ISTIO_META_DNS_CAPTURE: “true”
Virtual Machines
VM accessibility and discoverability is now significantly better with Istio’s DNS proxy. Although still in pre-alpha, Istio has the ability now to automatically add WorkloadEntries for each VM that joins the mesh. This means we can assign our VM (or set of VMs) a DNS entry that will be addressable within the mesh.
Enabling automatic VM WorkloadEntries
Example autocreated WorkloadEntry
Creating an Istio ServiceEntry to expose VM instances with label app: myvmapi via my-vm.com
When making a call within the mesh, we can see that our VM webserver is available at my-vm.com
VM DNS via kube-proxy
An alternative way of adding DNS entries for VM instances is via Kubernetes Services. You can create a Service as shown below, with label selectors pointing to the Istio WorkloadEntries. This will also make the VM instances available on my-vm.vm.svc.cluster.local
Istio DNS proxy on the VM
The Istio DNS proxying also applies to the VM as well. We can check on the Virtual Machine that istio.io is still pointing to the virtual ip address in the earlier examples.
Multi-cluster
The Istio DNS proxy makes internal multi-cluster routing much easier and requires less configuration.
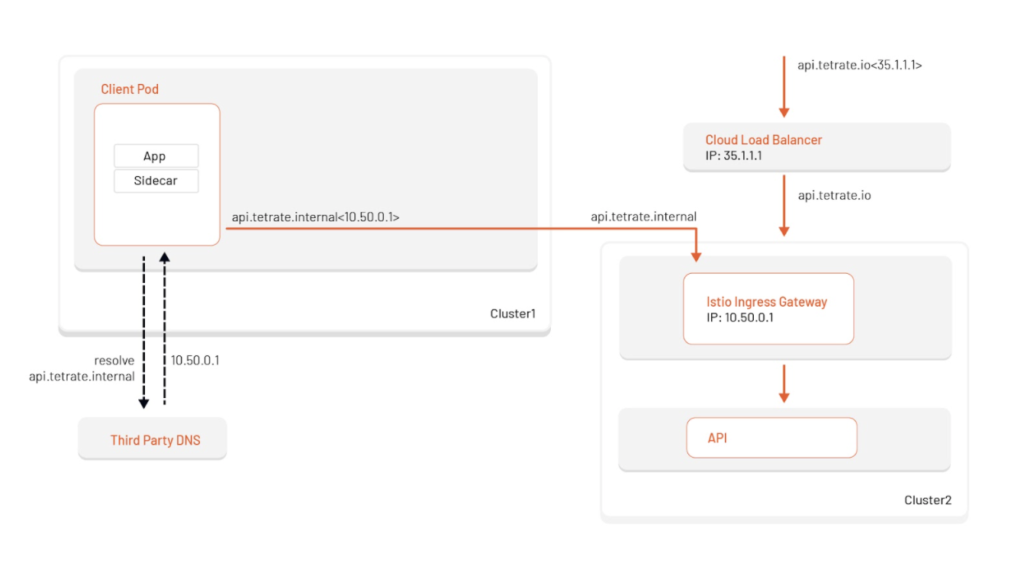
For example, If we wanted to expose my API api.tetrate.io to the internet via a cloud load balancer, you would typically assign a public DNS entry to that cloud load balancer (Example api.tetrate.io:35.1.1.1). Behind that cloud load balancer there might be an Istio ingress-gateway listening on api.tetrate.io, forwarding requests to an application. If we wanted to access this application from another cluster, we would call api.tetrate.io (35.1.1.1), but this is less than ideal. We would be accessing the API via its public load balancer, when we could and should be accessing it within my internal network. Let’s take a look at how we would solve this with Istio’s DNS proxy.
Internal routing for externally exposed service
To keep traffic internal, we are going to need another DNS entry at which our client applications can reach the API. In the below example, we created api.tetrate.internal for the ingress gateway’s internal IP address of 10.50.0.1 in our third-party DNS provider. We can then configure our client applications to use this host instead of api.tetrate.io. We will also need to add an additional listener for the host api.tetrate.internal within the Istio ingress-gateway.


This configuration is the most common today, but it has some drawbacks that Istio’s DNS proxy can address.
Drawbacks of not using Istio’s DNS proxy (the above configuration):
- Configures client applications to use a different hostname than the publicly available one.
- Internal routing: api.tetrate.internal
- External routing: api.tetrate.io
- Uses listeners for external and internal hosts on Istio ingress gateway.
- Relies on 3rd party DNS for internal IP address resolution.
- A lot of companies currently use public DNS servers for resolution of internal services.
Multi-cluster routing with DNS Proxy
With Istio’s DNS proxy, multi-cluster internal routing is much easier. Just create a ServiceEntry for api.tetrate.io with the Istio ingress-gateway IP address and now your client applications can route internally on the same host! The Istio sidecar now takes care of resolving the hostname with the assigned VIP and injecting the internal IP address of the gateway. There is no need for third party DNS, multiple host listeners on the ingress-gateway, and finally no changes are needed to your client applications to differentiate between external and internal routing.


1.8 Istio Release Notes – https://istio.io/latest/news/releases/1.8.x/announcing-1.8/
Expanding into new frontiers – Smart DNS proxying in Istio — https://istio.io/latest/blog/2020/dns-proxy/
VM Install Demo – https://istio.io/latest/docs/setup/install/virtual-machine/
Nick Nellis is a software engineer at Tetrate, the enterprise service mesh company. He is a DevOps expert on Istio, public cloud architecture, and infrastructure automation. This article was reviewed by Tetrate engineers Weston Carlson and Vikas Choudhary and content editor Tevah Platt. This article was first published in the New Stack.


