What is an Istio Operator?
For a long time, the primary tools for installing, upgrading, and managing Istio installations were Helm and Kubernetes CLI. Later, Istio 1.4 introduc

For a long time, the primary tools for installing, upgrading, and managing Istio installations were Helm and Kubernetes CLI. Later, Istio 1.4 introduced a new method of installing Istio using the Istio CLI.
That brought improvements over Helm as it allowed for all API fields to be validated before installation, making more minor updates easier. Under the hood, the operator API was powering the installation engine.
By the next release (1.5), the Istio operator command was added to the Istio CLI, and the Istio operator is the topic of this blog post.
Tetrate offers an enterprise-ready, 100% upstream distribution of Istio, Tetrate Istio Subscription (TIS). TIS is the easiest way to get started with Istio for production use cases. TIS+, a hosted Day 2 operations solution for Istio, adds a global service registry, unified Istio metrics dashboard, and self-service troubleshooting.
What is an Istio operator?
The operators and the operator pattern are a way to automate repeatable tasks. In Kubernetes, an operator uses custom resources and a controller to manage applications and their components.
Istio operator manages all aspects of the Istio service mesh installations. Instead of manually maintaining the Istio mesh installation and Istio CLI versions, you can use the Istio operator.
Istio operator consists of an application deployed to the Kubernetes cluster and a custom resource called IstioOperator that describes the desired state of your Istio installation. The operator uses the IstioOperator resource to manage and maintain your Istio service mesh installation.


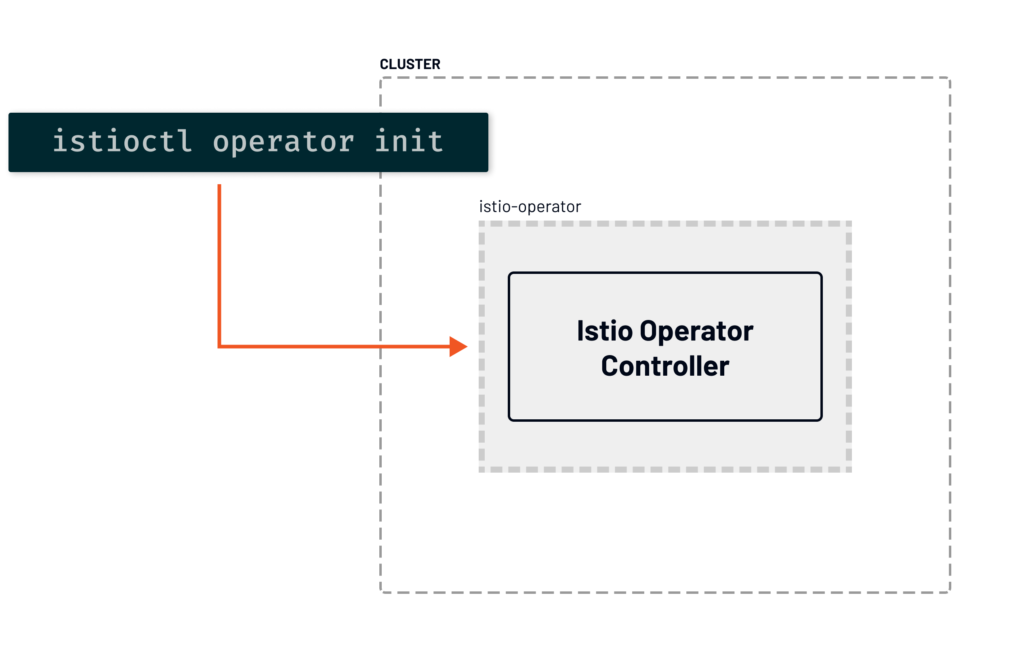
Using the Istio CLI and the istioctl operator init command, we can deploy the Istio operator controller to the Kubernetes cluster.
Running the _init_command creates the custom resource definition for the operator, the operator controller deployment, the service to access operator metrics, necessary Istio operator role-based access control (RBAC) rules, and the namespaces the operator is supposed to watch.
What can be configured?
As part of the initialization, we can configure the following:
- Namespace in which the operator gets installed (by default, it’s installed in the istio-operator namespace)
- Namespaces the operator watches (if not provided, istio-system is the only watched namespace)
- Revision and tag strings for the operator
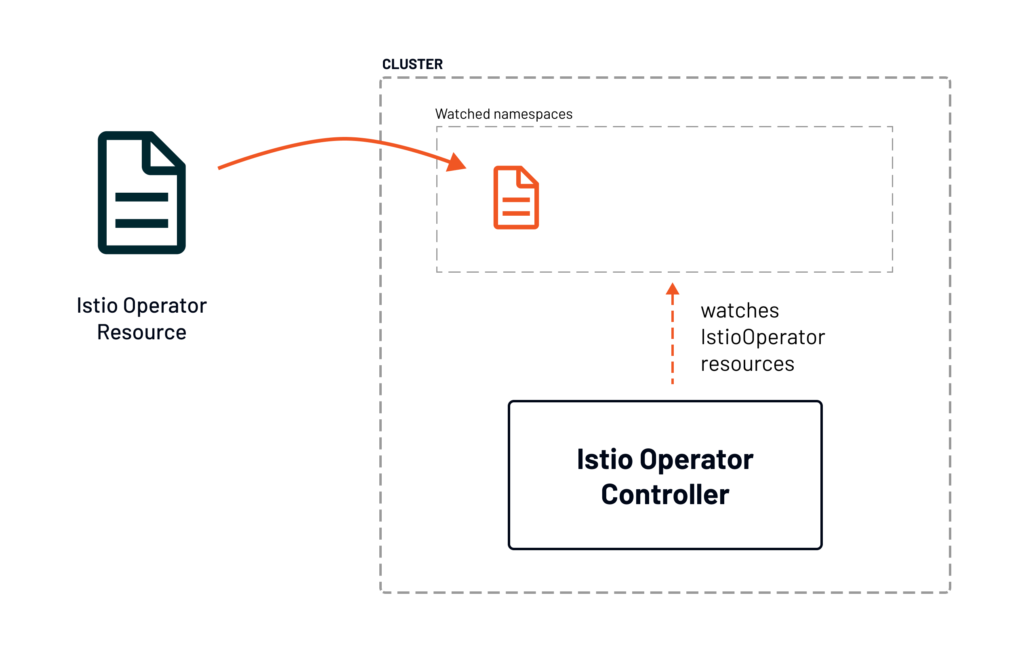
Once the operator is installed and running, it needs a custom resource to tell it how to install Istio. This resource is called IstioOperator, and it tells the operator how to install Istio.
Here’s an example of an IstioOperator resource:
With the resource, we can configure which Istio installation profile we want to use, a custom Istio Docker image, global mesh settings, and settings for each component, such as the gateways and the pilot.
What are Istio installation configuration profiles?
The installation profiles are built-in configuration profiles we can use to install Istio. There are six different profiles: default, demo, minimal, external, empty, and preview. Each of the profiles provides customization of the Istio control plane and the sidecars. You can read more about the differences between profiles in the Installation Configuration Profiles documentation.
For the operator to install Istio, we have to deploy the IstioOperator into one of the Istio operator controller watches. If we don’t provide the watched namespaces explicitly, the Istio operator controller will monitor the istio-system namespace. That means we can deploy the IstioOperator resource to the istio-system namespace.


The controller gets notified of the new IstioOperator resource in the namespace. It will process it to figure out what it needs to install or update and begin installing the Istio service mesh based on the resource configuration.


Usually, it takes at most 90 seconds for the controller to pick up the changes from the resource and then about two minutes for it to completely install Istio.
You can monitor the progress by listing the IstioOperator resource as shown in the example below:
$ kubectl get iop --all-namespaces
NAMESPACE      NAME                        REVISION   STATUS       AGE
istio-system   my-installation                      HEALTHY      11m
Additionally, if we want to see more details, we can look at the logs from the Istio operator deployment.
Controlling Istio installation using the operator
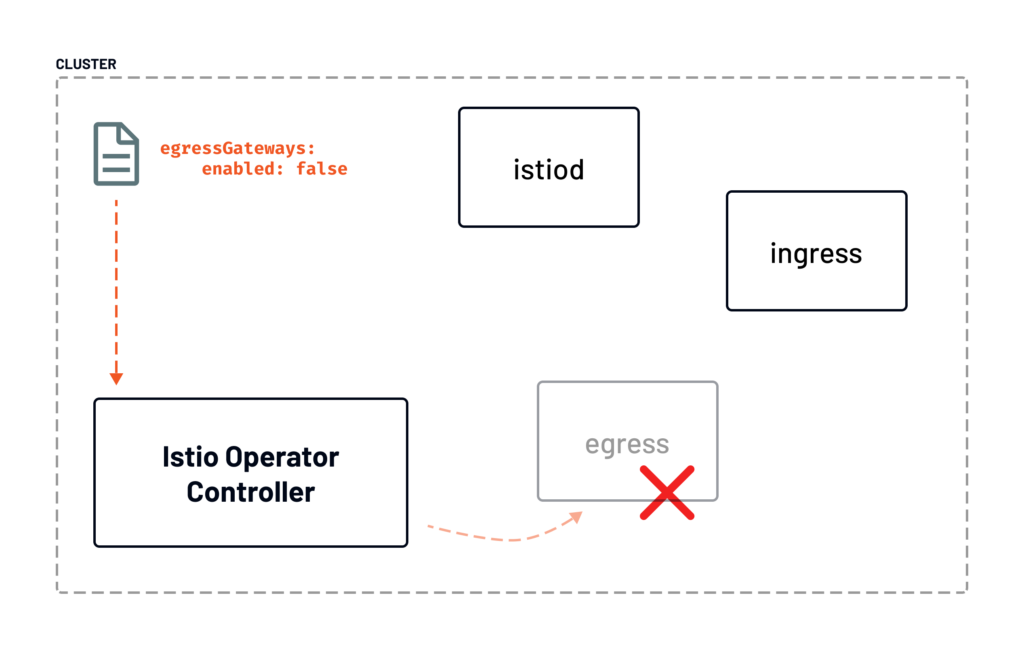
This shouldn’t come as a surprise, but you can control every aspect of your Istio installation through the operator. For example, do you want to switch the installation from the demo profile to the default profile? It’s straightforward. Update the profile field in the IstioOperator and re-deploy the resource. The controller will do the job of bringing the existing Istio installation to the desired state, expressed in the IstioOperator resource.


Consider the diagram above where we decided to disable the egress gateway by setting the enabled field to false. After we’ve deployed the updated IstioOperator resource, Kubernetes notified the Istio operator controller about the change in the resource. Then it went to work to remove the egress gateway while keeping the rest of the components intact.
How to configure the Istio operator
Let’s take a look at which aspects of the Istio installation we can configure in the operator resource by breaking it down into three sections:
- Global configuration
- Mesh configuration
- Component configuration
One way to discover the configuration of different Istio profiles is by running the istioctl profile dump command. This command will output the YAML representation of any Istio installation profile, and it can give us insight into different configurations.
Global configuration
The global configuration includes the top-most fields in the resource. It allows us to configure things such as the installation profile name, the path to the installation package, the root Docker image path, Docker image tags, the namespace to install control plane resources into, revision, and others.
For example, the IstioOperator resource above will use the minimal profile, a custom Docker registry, and revision.
Mesh configuration
The mesh configuration or the settings under the meshConfig field contain the internal configuration of the control plane components.
For example, you could configure things such as the access log format, log encoding, enable or disable tracing, or change the root namespace.
The meshConfig is also the spot where you could set the default Envoy proxy configuration, things such as outbound traffic policy, discovery selectors, inbound and outbound cluster stat prefixes, trust domains, and more.
Component configuration
The component configuration allows us to adjust Kubernetes resource settings, enable or disable individual components and configure component-specific settings. The components we can configure are the following:
- Pilot (pilot)
- Container network interface (cni)
- Ingress gateways (ingressGateways)
- Egress gateways (egressGateways)
Each component also has a k8s field that allows us to configure Kubernetes resource settings. We can configure resource requests and limits, update annotations and environment variables in the Kubernetes deployment, configure readiness probes, replica counts, and anything else you could configure in the Kubernetes resource.
Additionally, we can provide a list of patches for the Istio operator to apply to the resource through overlays.
The example above shows how to modify the memory requests for the pilot component and disable the ingress gateway.
How to install an internal ingress gateway using Istio operator
Let’s look at an example of how to use the Istio operator to install Istio. After installing Istio, we’ll create a second IstioOperator to install an additional internal ingress gateway.
The example assumes that you have access to a Kubernetes cluster.
To get started, we’ll initialize the Istio operator first. To do that, we can run the following command:
$ istioctl operator init
Installing operator controller in namespace: istio-operator using image: docker.io/istio/operator:1.10.2
Operator controller will watch namespaces: istio-system
✔ Istio operator installed
✔ Installation complete
The init command will create the operator in the istio-operator namespace and the namespaces for the operator to watch. Since we haven’t provided any namespaces for the operator to manage, it defaults to the istio-system namespace.
If you list the Pods in the istio-operator namespace using `kubectl get po -n istio-operator` you’ll see the Pod that runs the Istio operator controller.
$ kubectl get po -n istio-operator
NAME                              READY   STATUS    RESTARTS   AGE
istio-operator-769c594554-w8jvb   1/1     Running   0          5m13s
Creating the IstioOperator resource
Next, we can create the IstioOperator resource to install Istio. We’ll use the default profile. The default profile includes the Istio control plane (istiod) and a public ingress gateway (istio-ingressgateway):
Save the above YAML to the default-installation.yaml file and create the resource with kubectl apply -f default-installation.yaml.
To check the status of the Istio operator installation, you can list the Istio operator resource:
$ kubectl get iop -A
NAMESPACE      NAME                        REVISION   STATUS       AGE
istio-system   default-installation                   HEALTHY      23m
Once the status of the Istio operator resource changes to HEALTHY, we can create a namespace called internal and an IstioOperator resource to install an internal gateway into that namespace.
$ kubectl create ns internal
namespace/internal created
Now we can create another operator that installs an internal gateway to that namespace:
Save the above YAML to internal-gw.yaml and deploy it using kubectl apply -f internal-gw.yaml.
Just like before, we can check the status by listing the operator resources in all namespaces with kubectl get iop -A.
$ kubectl get iop -A
NAMESPACE      NAME                   REVISION   STATUS    AGE
istio-system   default-installation              HEALTHY   73s
istio-system   internal-gw                       HEALTHY   14s
If we look at the services with kubectl get svc -n internal you’ll notice that the external IP address is a private IP address that’s only accessible within the same network.
$ kubectl get svc -n internal
NAME          TYPE           CLUSTER-IP     EXTERNAL-IP     PORT(S)                                      AGE
ilb-gateway   LoadBalancer   10.96.11.109   10.XXX.XXX.XXX  15021:30704/TCP,80:32432/TCP,443:30653/TCP   63s
Let’s also create a Gateway resource for this internal ingress gateway:
Save the above YAML to the internal-gateway.yaml file and create it using kubectl apply -f internal-gateway.yaml.
We’ll use the httpbin as an example workload in the internal namespace. Let’s label the namespace for injection and then deploy httpbin to that namespace:
kubectl label ns internal istio-injection=enabled
kubectl apply -f https://raw.githubusercontent.com/istio/istio/master/samples/httpbin/httpbin.yaml -n internal
Finally, we can create the VirtualService and attach the internal-gateway resource to it:
Save the above YAML to httpbin-vs.yaml file and create it using kubectl apply -f httpbin-vs.yaml.
We’ve now created an internal ingress gateway that’s only accessible through the same network your Kubernetes cluster is running in.
To test the internal gateway, you can create a VM instance, SSH into the instance, and run curl [internal-gateway-IP] to access the httpbin service running in the cluster.
Conclusion
The Istio installation experience has come a long way. The latest iteration of the experience involves a custom resource called IstioOperator. Using the operator removes the need for managing different CLI versions and delegates this responsibility to an operator running within the Kubernetes cluster. This blog post explained what Istio operator is, how it works, and what components can be configured within the IstioOperator resources. To learn more about the Istio operator and how it works, check out one of these resources:


