Announcing Tetrate Istio Distro Deployment through EKS add-ons: Simplifying Istio on EKS
Today, we are excited to announce that Tetrate Istio Distro (TID) is deployable as an add-on for Amazon EKS. Istio is the de facto standard for runnin

Today, we are excited to announce that Tetrate Istio Distro (TID) is deployable as an add-on for Amazon EKS. Istio is the de facto standard for running service mesh on top of Kubernetes, and AWS EKS is one of the most popular ways to run Kubernetes. Tetrate’s TID is the first Istio distro deployable using EKS add-on commands, and this new capability makes it super simple to run Tetrate’s hardened, FIPS-compliant, and fully upstream Istio distribution everywhere EKS is available. By making TID available as an add-on, we are making it easier for organizations to productionize Istio, reduce operational complexity, and ultimately achieve application security and modernization goals faster. In this blog, I will show you how to get started with this new EKS add-on.
Why Run TID as an EKS Add-on?
When you want to deploy Istio in production, the first question is where to get your Istio distribution. Tetrate Istio Distro is Tetrate’s hardened, performant, and fully upstream Istio distribution. Teams often choose to run TID because it’s built by Tetrate’s Istio experts (in addition to being co-creators of Istio, we also built the official CNCF course on Istio). TID support and FIPS certificate are available on the AWS Marketplace as a paid subscription service (Tetrate Istio Subscription). It’s a great way to get started with Istio knowing you have a trusted distribution to begin with, have an expert team supporting you, and also have the option to get to FIPS compliance quickly if you need to.
As for how to run Istio, that’s where the EKS add-on comes in. If you are not familiar with EKS add-ons, they provide supporting operational capabilities to Kubernetes applications built right into the EKS workflow. Add-ons often provide installation and management of important capabilities for Amazon EKS clusters, they always include the latest security patches, bug fixes, and are validated by AWS to work with Amazon EKS.
Even though Istio is widely deployed, it has never been deployable through EKS add-ons until now. Not being an add-on means a little more work to deploy and manage Istio—such as getting the distro on AWS Marketplace and deploying via additional scripts, which also translates to more work operationally with some overhead down the road.
Now that TID is deployable through EKS add-ons, you get all the benefits of TID and EKS add-on in one package. AWS has fully tested and integrated TID into the EKS workflow, which means that deploying TID is now possible in EKS configuration, and turning it on can be as simple as one command line argument. This vastly simplifies the overhead of deploying and managing Istio over your EKS footprint, and best of all, it’s all validated by EKS experts from AWS engineering and Istio experts from Tetrate.
A Short Tutorial to Get Started
To deploy Tetrate Istio Distro on a new EKS cluster, customers have two options: the AWS web console and the command line. We’ll cover both approaches here, starting with the AWS web console.
Deploy the TID Add-on for Amazon EKS with the AWS Web Console
The AWS web console provides an intuitive way to deploy the add-on in an EKS cluster.
Watch the video or step through the tutorial below to see how easy it is to deploy Tetrate Istio Distro with EKS Add-ons.
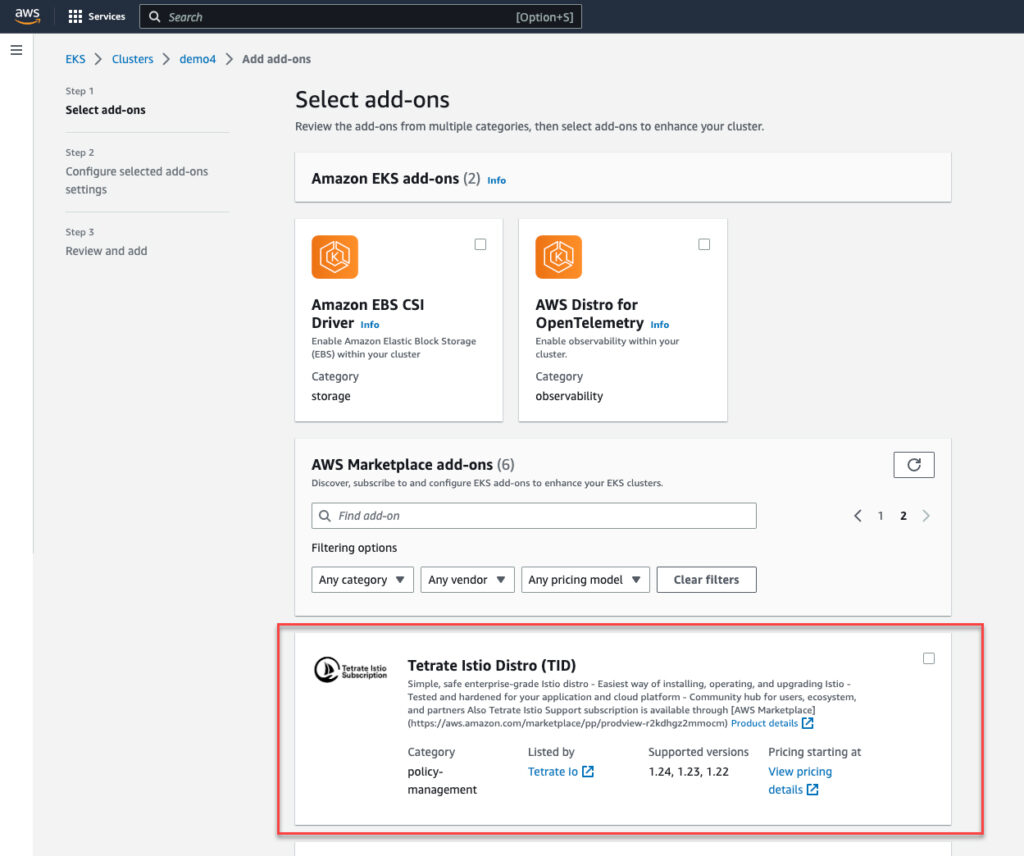
Step 1: Log into the AWS console and navigate to your EKS cluster. Then, pick the Tetrate Istio Distribution add-on as shown in the screenshot below (Figure 1):


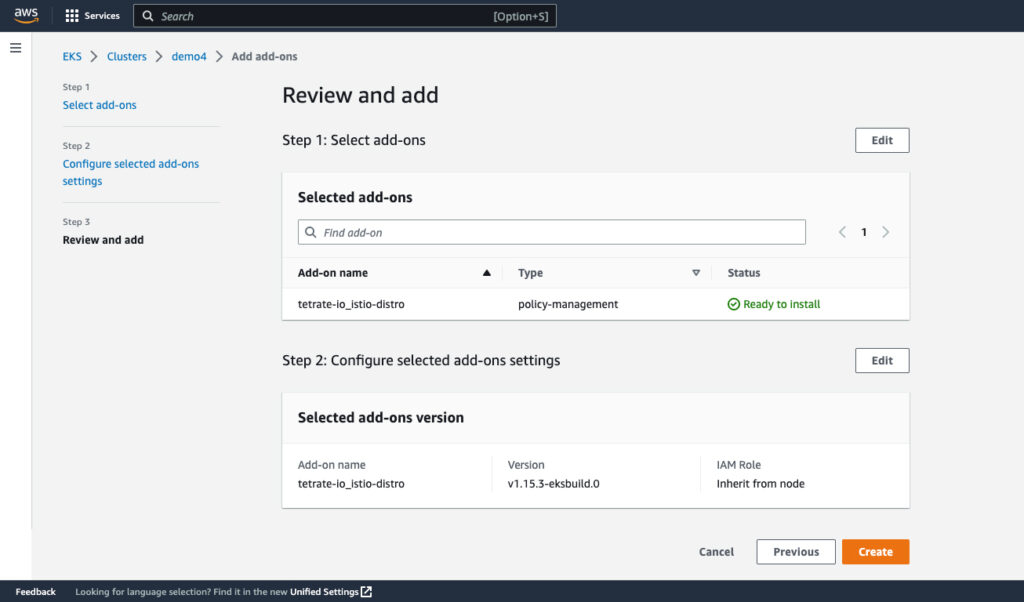
Step 2: After the add-on is selected, you will be presented with a configuration screen. The Istio deployment is simple and doesn’t require extensive settings. The final pre-deployment screen will look like this (Figure 2):


Step 3: The deployment will start as soon as you confirm the configuration (Figure 2) and click the “Create” button. You can monitor the deployment status in the AWS console as shown below (Figure 3):


Step 4: Wait until the deployment is complete and the status changes to “Active.” This may take about two minutes.


Congratulations—you have deployed an enterprise-grade Istio distro to your Amazon EKS cluster!
Deploy the TID Add-on for Amazon EKS from the Command Line
For repeatable cluster deployments, it makes sense to automate via command-line instructions. Follow the simple steps below to deploy the TID add-on for EKS via the aws CLI.
Note: You will need to subscribe to TID in the AWS Marketplace first before the TID add-on can be deployed in your AWS account.
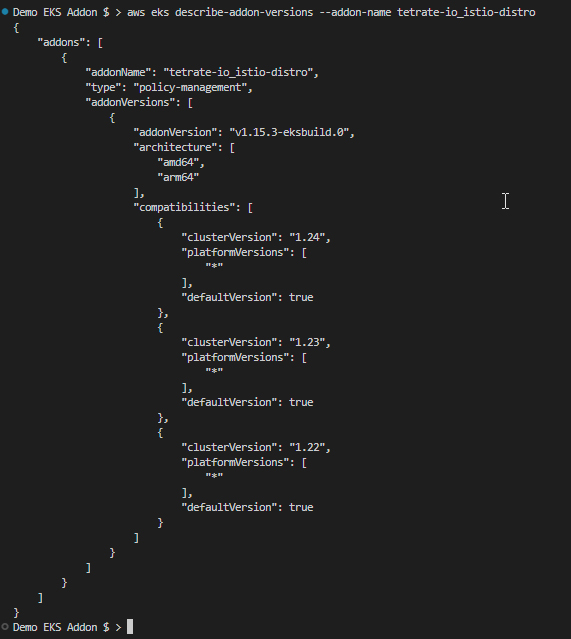
Step 1: Check to make sure that the add-on is available with the following command:
aws eks describe-addon-versions --addon-name tetrate-io_istio-distroIf the TID add-on is available, you should see output similar to the following (Figure 5):


Step 2: Deploy the TID add-on to your EKS cluster using the following command:
aws eks create-addon --addon-name tetrate-io_istio-distro --cluster-name <CLUSTER_NAME>

Step 3: Wait for the TID add-on to be deployed. This may take about two minutes. To get the current state use the following command:
aws eks describe-addon --addon-name tetrate-io_istio-distro --cluster-name

Step 4: Confirm that Istio has been deployed to your cluster by running the following command in the Kubernetes context to see that Istio pods are in “Running” state:
kubectl get pods -n istio-system

Congratulations—you have deployed an enterprise-grade Istio distro to your EKS cluster with a simple, repeatable set of command-line steps.
What’s next
You can try and deploy TID through EKS add-ons here. If you want a deeper dive into how this all works, sign up for this workshop. If you want to try Tetrate Istio Distro on its own, you can find it here. Contact us if you’d like the FIPS-compliant version. Once you have Istio up and running, you will probably need simpler ways to manage and secure your services beyond what’s available in Istio, that’s where Tetrate Service Bridge comes in. You can learn more about how Tetrate Service Bridge makes service mesh more secure, manageable, and resilient here, or contact us for a quick demo.


