Hands on with the New Kubernetes Gateway API, Using Envoy Gateway 0.2
In my other blog post this week, I talk about the new Kubernetes Gateway API and the release of Envoy Gateway 0.2
Note: This blog post was originally written in October 2022, based on the release of Envoy Gateway v0.2. It reflects the state of the project and ecosystem at that time. For the latest information, please refer to the Envoy Gateway documentation.
In my other blog post this week, I talk about the new Kubernetes Gateway API and the release of Envoy Gateway 0.2. In this post we’re going to get hands-on with Envoy Gateway and the Gateway API. Below are instructions that walk you step-by-step through installing Envoy Gateway, and a simple use case of exposing an HTTP app outside the cluster, through an Envoy proxy.
You don’t even need to play along at home if it’s inconvenient; I’ve included the output of every command as well, so you can see how it all works without needing a Kubernetes cluster.
And if you’re a fan of GUIs, at the end of the post I include screenshots and details of Tetrate’s proof-of-concept Envoy Gateway GUI based on Backstage, to show how easy it is to build such things against the Gateway API.
Let’s get started!
Create a Kubernetes Cluster
The first thing we need is a Kubernetes cluster to run Envoy Gateway in. Be careful using a cluster that’s used for other things (so maybe not your company’s prod environment…). The easiest and safest way is to use minikube to bring up a cluster on your local machine.
$ minikube start –driver=docker --cpus=2 --memory=2g

   minikube v1.27.0 on Arch 22.0.0 (x86_64)
	▪ KUBECONFIG=...
❗  For more information, see: https://github.com/kubernetes/kubernetes/issues/112135
   Using Docker Desktop driver with root privileges
   Starting control plane node minikube in cluster minikube
   Pulling base image ...
   Creating docker container (CPUs=2, Memory=2048MB) ...
   Preparing Kubernetes v1.25.2 on Docker 20.10.17 ...
	▪ Generating certificates and keys ...
	▪ Booting up control plane ...
	▪ Configuring RBAC rules ...
   Verifying Kubernetes components...
	▪ Using image gcr.io/k8s-minikube/storage-provisioner:v5
   Enabled addons: storage-provisioner
   Done! kubectl is now configured to use "minikube" cluster and "default" namespace by default
Install Envoy Gateway
Recall that Envoy Gateway is configured by the new Gateway API, rather than the old Ingress one. Gateway API hasn’t been merged into upstream Kubernetes yet, so our cluster won’t have it available. We “install” the API by deploying CRDs for it. The Envoy Gateway project provides a single file which will install Gateway API and deploy Envoy Gateway.
$ kubectl apply -f [https://github.com/envoyproxy/gateway/releases/download/v0.2.0/install.yaml](https://github.com/envoyproxy/gateway/releases/download/v0.2.0-rc1/install.yaml)This creates a lot of resources; I’ll address them in a couple sections. First, Gateway API:
customresourcedefinition.apiextensions.k8s.io/gatewayclasses.gateway.networking.k8s.io created
customresourcedefinition.apiextensions.k8s.io/gateways.gateway.networking.k8s.io created
customresourcedefinition.apiextensions.k8s.io/httproutes.gateway.networking.k8s.io created
customresourcedefinition.apiextensions.k8s.io/referencegrants.gateway.networking.k8s.io created
customresourcedefinition.apiextensions.k8s.io/referencepolicies.gateway.networking.k8s.io created
customresourcedefinition.apiextensions.k8s.io/tcproutes.gateway.networking.k8s.io created
customresourcedefinition.apiextensions.k8s.io/tlsroutes.gateway.networking.k8s.io created
customresourcedefinition.apiextensions.k8s.io/udproutes.gateway.networking.k8s.io created
namespace/gateway-system created
validatingwebhookconfiguration.admissionregistration.k8s.io/gateway-api-admission created
service/gateway-api-admission-server created
deployment.apps/gateway-api-admission-server created
serviceaccount/gateway-api-admission created
clusterrole.rbac.authorization.k8s.io/gateway-api-admission created
clusterrolebinding.rbac.authorization.k8s.io/gateway-api-admission created
role.rbac.authorization.k8s.io/gateway-api-admission created
rolebinding.rbac.authorization.k8s.io/gateway-api-admission created
job.batch/gateway-api-admission created
job.batch/gateway-api-admission-patch created
As you can see, this is mostly CRDs. But note that installing Gateway API also deployed some workload resources including Deployments, etc – the Gateway API comes with a webhook admission controller to validate the resources we deploy, which we can see with the following command:
$ kubectl get pods --namespace gateway-system

NAME                                        	READY   STATUS  	RESTARTS   AGE
gateway-api-admission-2dhk5                 	0/1 	Completed          0       70s
gateway-api-admission-patch-dbdbc           	0/1 	Completed          1       70s
gateway-api-admission-server-68485ffc97-gt8v4   1/1 	Running 	   0       70s
Let’s also take a look at the new CRDs adding to the cluster’s API surface.
$ kubectl api-resources | grep gateway.networking

gatewayclasses                	gc       	gateway.networking.k8s.io/v1beta1  	false    	GatewayClass
gateways                      	gtw      	gateway.networking.k8s.io/v1beta1  	true     	Gateway
httproutes                                 	gateway.networking.k8s.io/v1beta1  	true     	HTTPRoute
referencegrants               	refgrant 	gateway.networking.k8s.io/v1alpha2 	true     	ReferenceGrant
referencepolicies             	refpol   	gateway.networking.k8s.io/v1alpha2 	true     	ReferencePolicy
tcproutes                                  	gateway.networking.k8s.io/v1alpha2 	true     	TCPRoute
tlsroutes                                  	gateway.networking.k8s.io/v1alpha2 	true     	TLSRoute
udproutes                                  	gateway.networking.k8s.io/v1alpha2 	true     	UDPRoute
Now let’s look at Envoy Gateway itself.
namespace/envoy-gateway-system created
customresourcedefinition.apiextensions.k8s.io/envoyproxies.config.gateway.envoyproxy.io created
serviceaccount/envoy-gateway created
role.rbac.authorization.k8s.io/leader-election-role created
clusterrole.rbac.authorization.k8s.io/envoy-gateway-role created
clusterrole.rbac.authorization.k8s.io/metrics-reader created
clusterrole.rbac.authorization.k8s.io/proxy-role created
rolebinding.rbac.authorization.k8s.io/leader-election-rolebinding created
clusterrolebinding.rbac.authorization.k8s.io/envoy-gateway-rolebinding created
clusterrolebinding.rbac.authorization.k8s.io/proxy-rolebinding created
configmap/envoy-gateway-config created
service/envoy-gateway created
service/envoy-gateway-metrics-service created
deployment.apps/envoy-gateway created
As you might expect, these are workload resources and associated security and networking. After a short time we can see the running controller:
$ kubectl get pods --namespace envoy-gateway-system

NAME                        	READY   STATUS	RESTARTS   AGE
envoy-gateway-dc74c4d97-pntbj   2/2 	Running    0       35s
Install a Test App
We’ll also need something for the gateway to actually forward traffic to—something that acts like one of our apps. We can use httpbin for that, and the EG project provides convenient manifests for it.
$ kubectl apply -f https://raw.githubusercontent.com/istio/istio/master/samples/httpbin/httpbin.yaml

serviceaccount/httpbin created
service/httpbin created
deployment.apps/httpbin created
This will run in the default namespace:
$ kubectl get pods -n default

NAME                    	READY   STATUS	RESTARTS   AGE
httpbin-9dbd644c7-fhtw5 	1/1 	Running    0       4m16s
Configure Envoy Gateway
Now we can get on to configuring Envoy Gateway to do some request routing. The first thing we need to do is register the EG controller we just deployed, so that other resources can reference it to identify which gateway they’re configuring, in case you deploy several in one cluster. The single field, controllerName, matches a value which the controller registers with the Kubernetes cluster it’s running in.
$ kubectl apply -f - <<EOF
apiVersion: gateway.networking.k8s.io/v1beta1
kind: GatewayClass
metadata:
  name: my-envoy-gateway
spec:
  controllerName: gateway.envoyproxy.io/gatewayclass-controller
EOF

gatewayclass.gateway.networking.k8s.io/eg created
We can see some limited information about this new instance, and assuming our description was valid we’ll see ACCEPTED: True.
$ kubectl get gatewayclass -o wide
NAME   CONTROLLER                                  	ACCEPTED   AGE 	   DESCRIPTION
eg 	gateway.envoyproxy.io/gatewayclass-controller   True   	   2m38s
Next, let’s configure a Gateway object—this opens the network port(s) we’d like the Envoy proxy(s) to listen on. For this simple demo, we’ll bind to a high port and not use TLS, so I’ve called it “insecure-port”.
$ kubectl apply -f - <<EOF
apiVersion: gateway.networking.k8s.io/v1beta1
kind: Gateway
metadata:
  name: insecure-port
spec:
  gatewayClassName: my-envoy-gateway
  listeners:
    - name: http
      protocol: HTTP
      port: 8080
EOF
When we inspect that, we’ll see it doesn’t say it’s ready. This approval is held back since we’re using a local development cluster that can’t make the kind of cloud load balancers a “real” one would be able to (hence the address field is empty too). Don’t worry about this, it’ll still work fine.
$ kubectl -n default get gateway -o wide

NAME        	CLASS             ADDRESS   READY   AGE
insecure-port   my-envoy-gateway                    2m54s
Finally we can set up routing for some HTTP traffic. In this simple example, we match any request for the vhost “www.example.com”, on any path, and send it to the httpbin instance we deployed earlier.
$ kubectl apply -f - <<EOF
apiVersion: gateway.networking.k8s.io/v1beta1
kind: HTTPRoute
metadata:
  name: httpbin
spec:
  parentRefs: [ {name: insecure-port} ]
  hostnames: ["www.example.com"]
  rules:
    - matches:
        - path: {type: PathPrefix, value: /}
      backendRefs:
        - {group: "", kind: Service, name: httpbin, port: 8000, weight: 1}
EOF

httproute.gateway.networking.k8s.io/httpbin created
Inspecting this kind of resource doesn’t currently show us much, but we can see it was successfully deployed at least.
$ kubectl get httproute -n default -o wide
NAME   	  HOSTNAMES         	AGE
httpbin	  ["www.example.com"]   58s
One last thing to note is that only now is an instance of Envoy actually started (before it was just the controller, which doesn’t itself handle traffic). This is an optimization on EG’s behalf: lazy creation of proxies. Check the “age” field on your system and see how it’s very recent.
$ kubectl get pods -n envoy-gateway-system
NAME                        	                READY   STATUS	  RESTARTS   AGE
envoy-default-insecure-port-5879556bd4-r5ggw   	1/1 	Running      0       90s
envoy-gateway-dc74c4d97-pntbj                   2/2 	Running      0       13m
Initiate Test Traffic
Like I said before, we can’t get a real cloud load balancer, since we’re using a local development cluster. But minikube has a neat feature which will expose the cluster’s services to our local machine—including the proxy that EG spun up. The 8080 port we opened will then be available on loopback.
$ minikube tunnelThat command blocks, so open a new terminal to send a request that’ll be routed to httpbin, as per the rules we deployed.
$ curl --header "Host: www.example.com" 127.0.0.1:8080/headers

HTTP/1.1 200 OK
server: envoy
date: Fri, 07 Oct 2022 12:41:32 GMT
content-type: application/json
content-length: 175
access-control-allow-origin: *
access-control-allow-credentials: true
x-envoy-upstream-service-time: 14

{
	"headers": {
    	"Accept": "application/json, */*",
    	"Host": "www.example.com",
    	"User-Agent": "curl/7.79.1",
    	"X-Envoy-Expected-Rq-Timeout-Ms": "15000"
	}
}
So there we have it. It works! That was just a simple demo, but you can explore the rest of the Gateway API surface and start using more of the features – Envoy Gateway’s docs will be a good guide for that. Do be kind of Envoy Gateway at this early point—it’s still a work in progress!
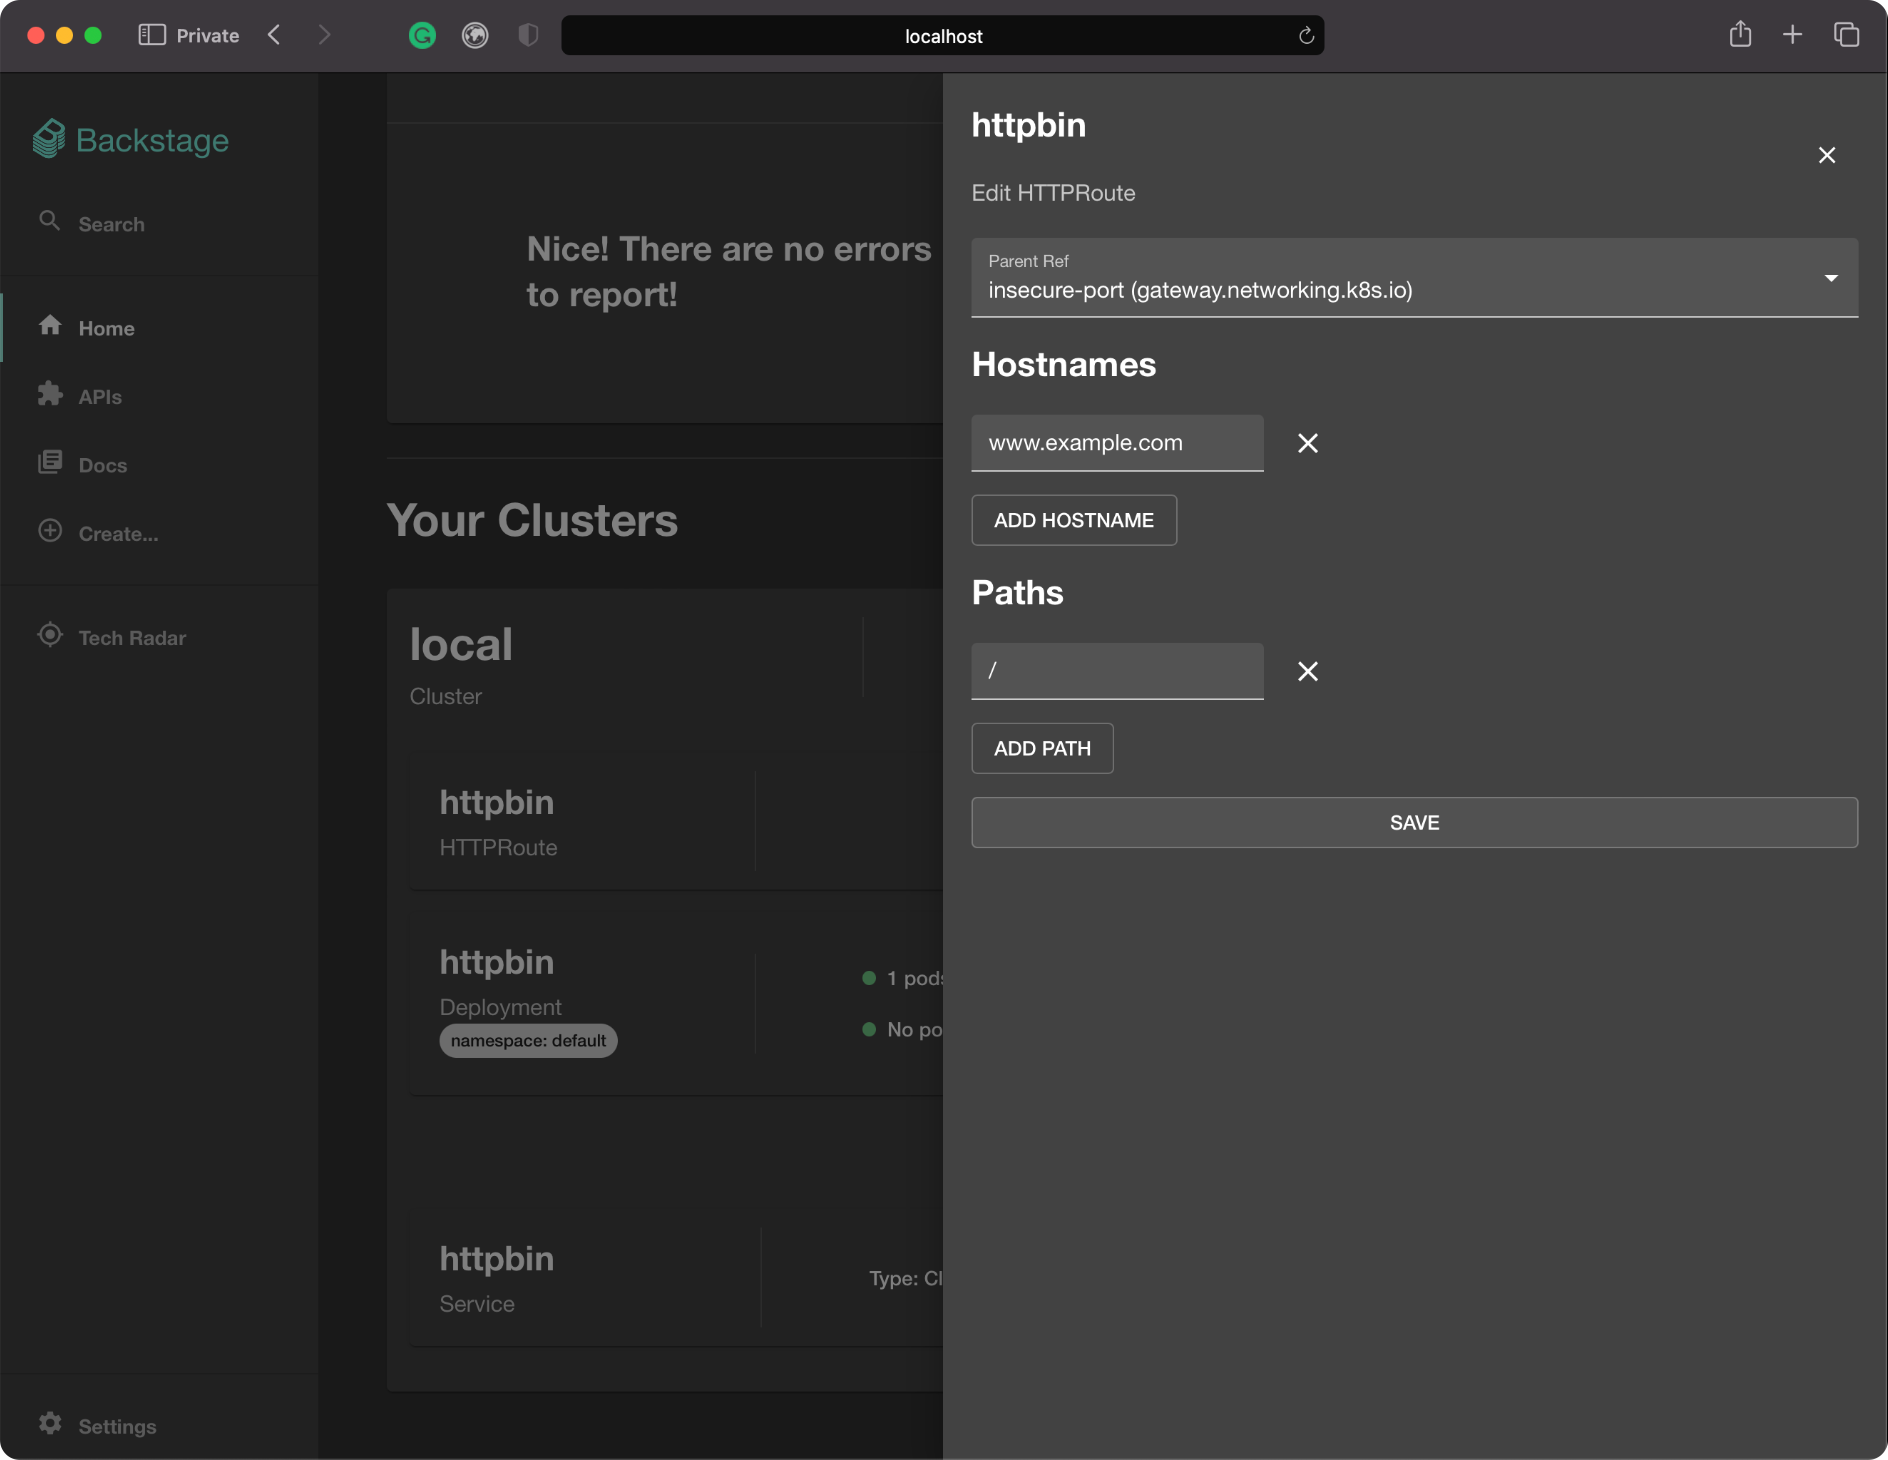
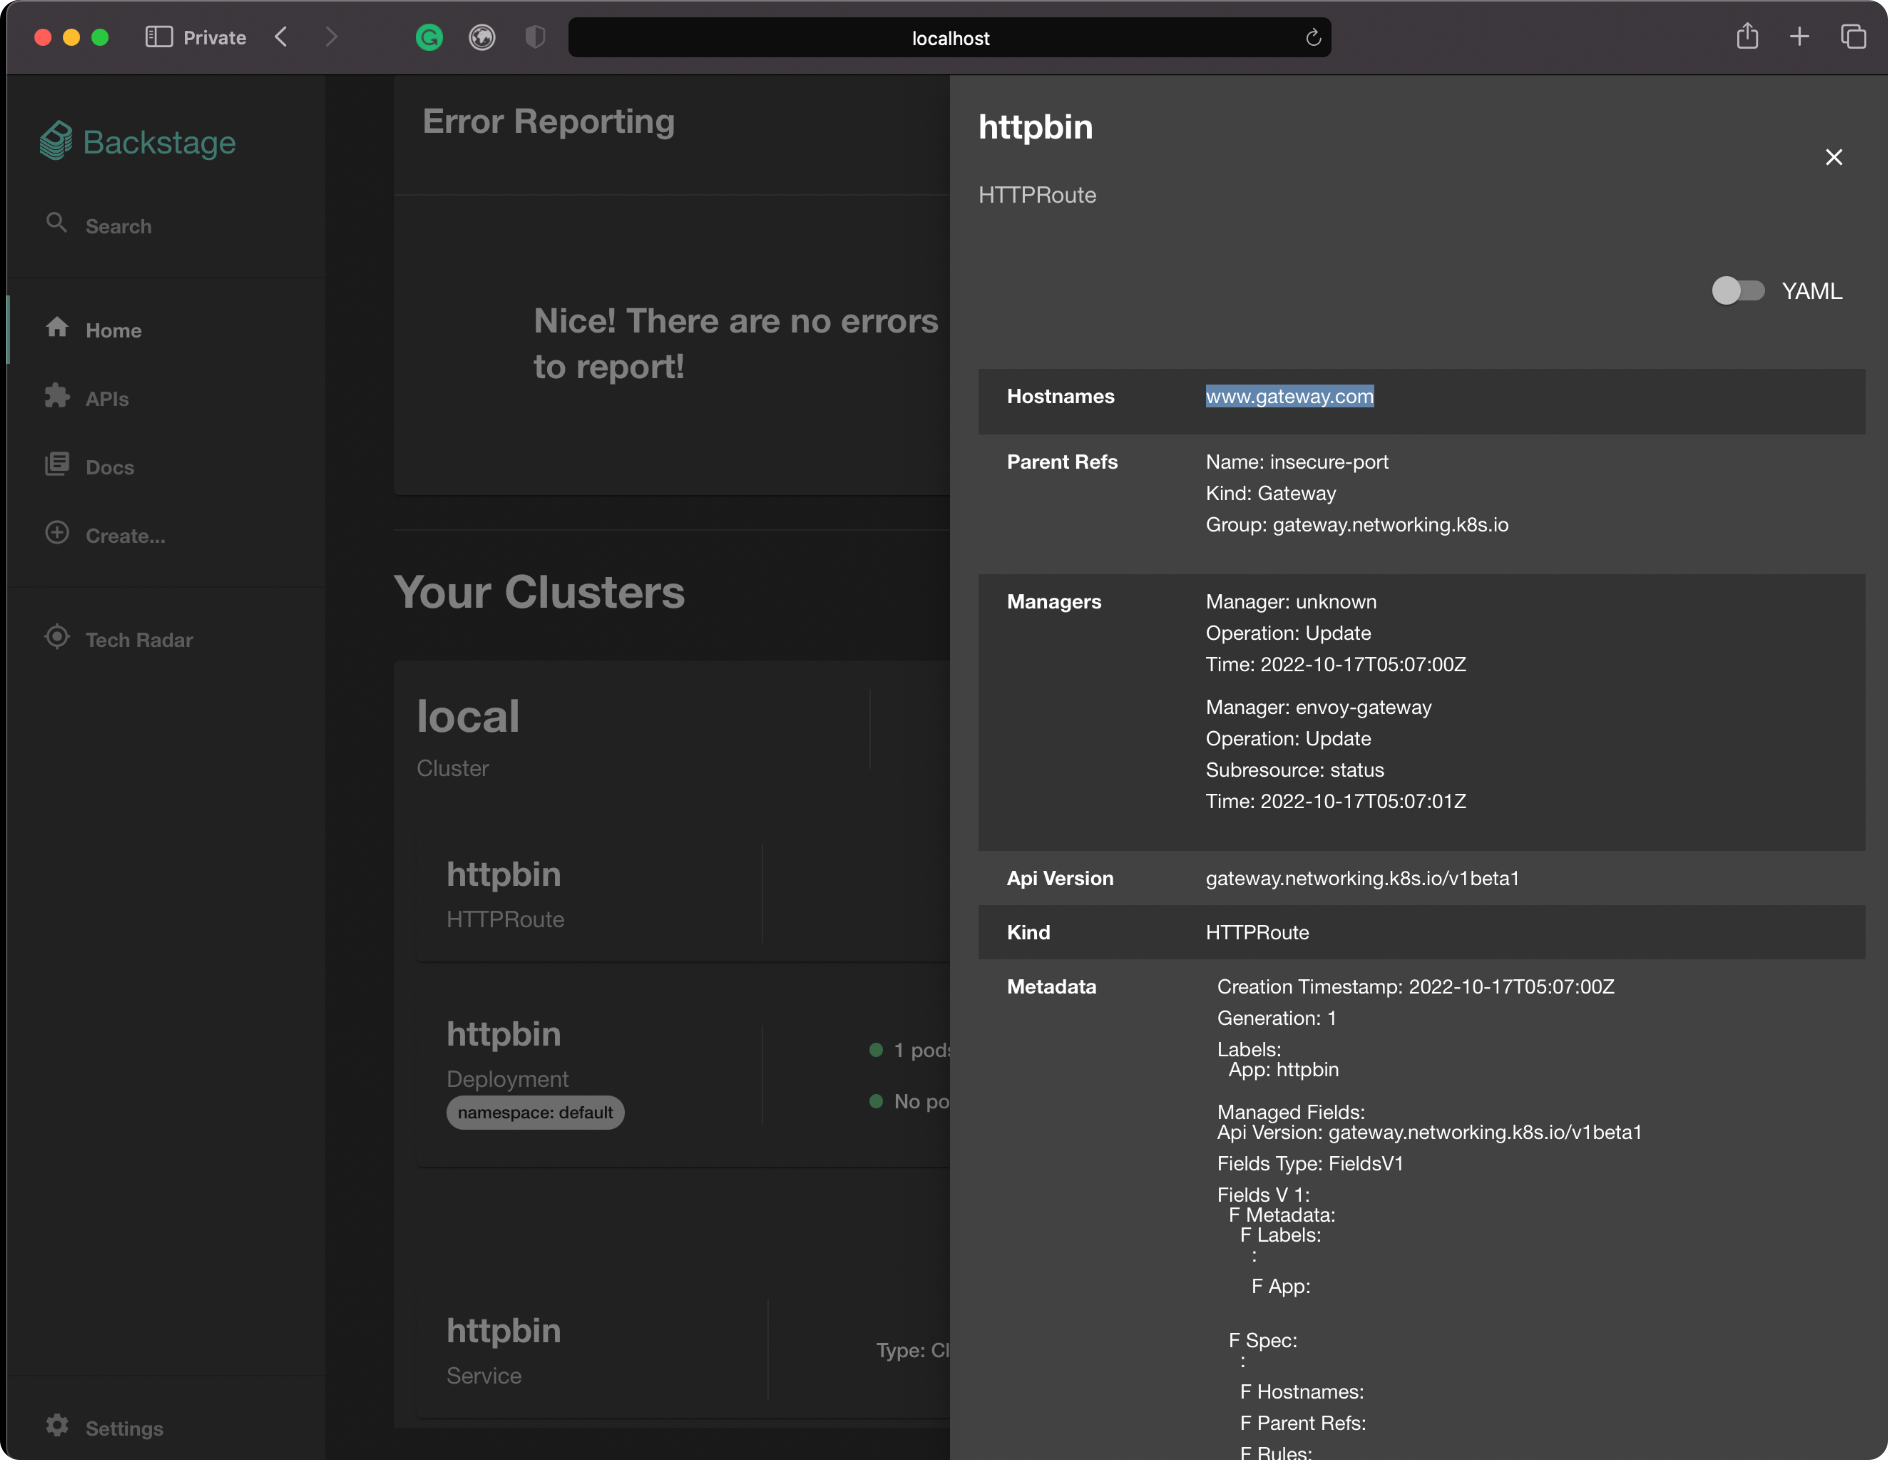
An Example GUI
The instructions I gave are for the command line, but a good GUI is a great way to interact with any system. EG’s implementation of the standard Gateway API will allow a thriving ecosystem of interoperable interfaces to emerge. To kick this area off, Tetrate has built a proof-of-concept UI for EG, using Backstage, the emerging standard for developer interfaces. Below I’ll show a couple screenshots of how it looks inspecting the demo setup from above.
If you’d like to play with this, or fork it, we’ve published the code—fair warning that this is pre-alpha, and just an example of what’s possible to build in a week! If you’re at KubeCon Detroit swing by our booth and we can show it to you in person!
If you’re getting started with Istio and Envoy, check out Tetrate Academy where you’ll find a ton of free courses, on-demand workshops.